How to Increase Water Pressure with a Well Pump – Complete DIY Guide
Diagnose low water pressure, adjust your pressure switch, size the right pressure tank, and install a booster pump. Restore strong, steady water flow throughout your home.
Shop Recommended Tools & Parts🔍 Quick Overview: Low water pressure from a well is usually caused by a misadjusted pressure switch, a waterlogged pressure tank, or an undersized pump. This guide walks you through each fix, from simple adjustments to full system upgrades.
Understanding Your Well Water Pressure System
If you rely on a private well, you’ve likely experienced frustratingly weak water flow – especially during peak usage. Increasing water pressure with a well pump isn’t just about turning a dial; it requires understanding how your pressure tank, pressure switch, and pump work together.
Most well systems use a submersible or jet pump to push water into a pressure tank. The tank stores water under pressure, so the pump doesn’t cycle on every time you open a faucet. A pressure switch controls when the pump turns on and off based on the pressure inside the tank. When pressure drops to the "cut-in" setting (typically 30 or 40 PSI), the pump starts. When it reaches the "cut-out" setting (usually 50 or 60 PSI), the pump stops.
If your pressure is too low, you may notice weak showers, slow-filling toilets, or sprinklers that can’t cover your lawn. This guide covers every practical solution, from the simplest adjustments to more involved upgrades like adding a booster pump. Let’s start with the most common fixes.
1. Adjust the Pressure Switch Settings
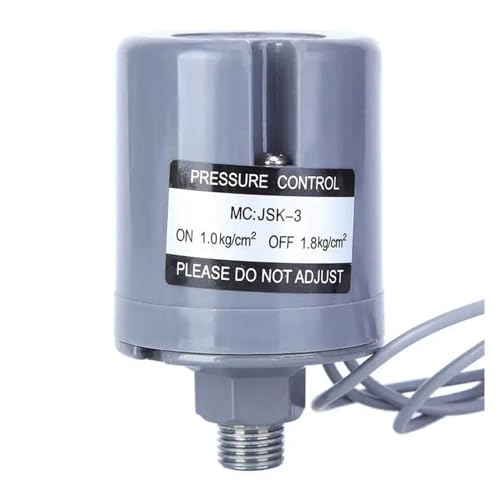
The pressure switch is a small box usually mounted near the pressure tank. It has two adjustment nuts: one for the cut-in pressure (turn-on) and one for the differential (range between cut-in and cut-out). Increasing the cut-in and cut-out settings is often the quickest way to raise water pressure.
- Locate the switch: Typically found near the pressure tank, connected to a small pipe.
- Adjust the cut-in pressure: Turn the larger nut clockwise to raise the cut-in pressure (e.g., from 30 to 40 PSI).
- Adjust the cut-out pressure: Turn the smaller nut clockwise to raise the cut-out pressure (e.g., from 50 to 60 PSI). Keep the differential around 20 PSI.
- Test the system: Restore power and run water to see the new pressure range on the gauge. Aim for 40/60 PSI for most homes.
If your pressure gauge is reading below 30 PSI when the pump is off, you may need to replace the switch entirely. A new 40/60 PSI pressure switch costs about $20–$30 and is a simple DIY swap. Learn more about adjusting water pressure in your home.
2. Inspect the Pressure Tank (Air Charge)
Your pressure tank should have an air charge of about 2 PSI below the cut-in pressure. If the tank is waterlogged (too much water, not enough air), the pump will short-cycle, and you’ll experience pressure fluctuations and low flow.
To check the air charge:
- Turn off power to the pump and drain the tank by opening a faucet until no water flows.
- Use a tire pressure gauge on the Schrader valve at the top of the tank. The reading should be 28 PSI for a 30/50 switch, or 38 PSI for a 40/60 switch.
- Add air with a portable compressor if the pressure is low. Do not exceed the recommended PSI.
- Restore power and let the tank fill. Check for steady pressure at multiple faucets.
If the tank is old or corroded, consider replacing it. A new 20-gallon pressure tank costs around $150–$250 and can dramatically improve pressure stability. See more tips for improving household water pressure.
3. Inspect Pipes, Valves, and Fixtures
Sometimes the problem isn't the pump or tank at all – it's a restriction in your plumbing. Mineral buildup in pipes, a partially closed shutoff valve, or a clogged aerator can all reduce pressure.
- Check the main shutoff valve near the pressure tank. Ensure it’s fully open.
- Inspect the whole-house sediment filter (if you have one). A clogged filter can drop pressure by 10–20 PSI.
- Remove and clean faucet aerators and showerheads to eliminate debris.
- Expose and inspect exposed pipes for signs of corrosion or scale buildup, especially if you have galvanized pipes.
If you find scale buildup, a professional descaling or pipe replacement may be needed. For minor clogs, cleaning aerators and filters is an easy DIY fix.
4. Install a Constant Pressure Valve or Booster Pump
If you’ve adjusted the switch and tank but still experience pressure drops during high-demand times (e.g., when someone flushes a toilet while the shower runs), consider a constant pressure system. A constant pressure valve or a booster pump can maintain steady pressure regardless of demand.
- Constant pressure valve (CPV): Installed on the pump discharge, it modulates water flow to maintain a set pressure (e.g., 50 PSI). Cost: $200–$500.
- Booster pump: A separate pump installed after the pressure tank to increase pressure for the whole house. Cost: $300–$800 plus installation.
- Variable frequency drive (VFD): An advanced option that adjusts pump speed to match demand, providing the most consistent pressure. Cost: $1,000–$2,500.
For most homeowners, a booster pump is the most cost-effective solution. It can raise pressure by 20–30 PSI and is relatively easy to install if you have basic plumbing skills. Learn more about boosting well pressure with add-on equipment.
5. When to Hire a Well Pump Professional
While many pressure issues are DIY-friendly, some problems require a licensed well contractor. If you’ve tried the steps above and still have low pressure, or if you notice any of the following signs, it’s time to call in an expert:
- Pump runs continuously – indicates a leak or a failing pump.
- Air in the water lines – often means the well is running dry or the pump is pulling air.
- Visible damage to the pressure tank or pump – rust, cracks, or electrical issues.
- Low well yield – you may need a new well or a storage tank.
A professional can perform a flow test, inspect the pump, and recommend the right size replacement if needed. Find licensed contractors near you who specialize in well systems.
Final Checklist: Boost Your Well Water Pressure
- ☑️ Adjust the pressure switch to 40/60 PSI
- ☑️ Check and recharge the pressure tank air charge
- ☑️ Clean aerators, filters, and ensure valves are fully open
- ☑️ Install a booster pump or constant pressure valve for consistent flow
- ☑️ Schedule a professional well inspection every 2–3 years
By following this guide, you’ll be able to increase water pressure with a well pump and enjoy strong, reliable water flow throughout your home. Whether you make a simple switch adjustment or invest in a booster pump, the result is better showers, faster appliance fills, and greater comfort.
Ready to upgrade your system? Browse the recommended tools and parts below to find the right equipment for your project.