Water Pressure Test Gauge: The Ultimate Guide to Accurate Home Water Pressure Testing
Learn how to use a water pressure test gauge to diagnose plumbing issues, check for high or low pressure, and protect your home's plumbing system. Complete buyer's guide inside.
What Is a Water Pressure Test Gauge and Why Do You Need One?
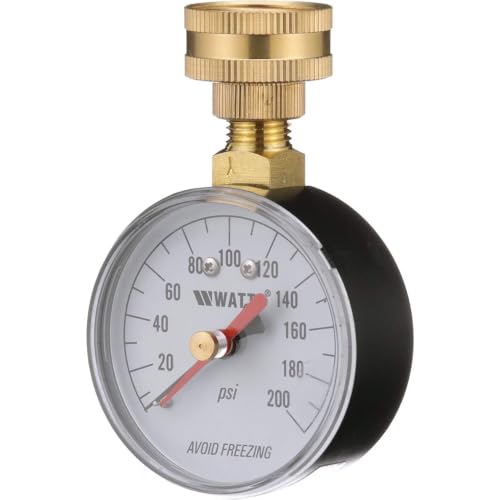
A water pressure test gauge is a simple yet essential tool for any homeowner or DIY enthusiast. It measures the water pressure coming into your home from the municipal supply or well system. Knowing your home's water pressure is critical because high water pressure can damage pipes, appliances, and fixtures, while low pressure can make daily tasks like showering or washing dishes frustrating.
Using a water pressure tester is one of the first steps in diagnosing plumbing repairs. Whether you're dealing with a dripping faucet, a noisy pipe, or inconsistent flow, a pressure gauge provides the data you need to make informed decisions. This guide will walk you through everything you need to know about water pressure test gauges, how to use them, and how to interpret the results.
Did You Know? The ideal water pressure for most homes is between 40 and 60 PSI (pounds per square inch). Anything above 80 PSI can cause serious damage, and anything below 30 PSI is considered too low for comfortable use.
How to Use a Water Pressure Test Gauge: Step-by-Step Guide
Testing your home's water pressure is a straightforward task that takes less than 10 minutes. Follow these steps to get an accurate reading:
1. Choose the Right Location
Attach the gauge to a hose bib (outdoor spigot) or the washing machine cold water valve. Avoid using a faucet with a screen or aerator as it can affect the reading.
2. Turn Off All Water
Make sure no water is running inside or outside the house. This ensures the gauge measures static pressure, which is the most accurate baseline.
3. Attach the Gauge
Screw the water pressure test gauge onto the spigot or valve. Hand-tighten it securely, but do not over-tighten as it may damage the threads.
4. Read the Pressure
Turn on the water and check the needle on the gauge. Allow it to stabilize for a few seconds. Record the PSI reading.
5. Check for Fluctuations
For a more thorough diagnosis, turn on a faucet inside the house and observe if the pressure drops significantly. This can indicate flow restrictions or pipe issues.
If you find that your pressure is consistently above 80 PSI, you may need to install a pressure reducing valve (PRV). For low pressure (below 40 PSI), check for plumbing contractor solutions or consider a pressure booster pump. Regular testing with a reliable water pressure tester can help you catch problems early and avoid costly repairs.
Interpreting Your Water Pressure Test Results
Understanding what your water pressure test gauge tells you is key to maintaining a healthy plumbing system. Here's a quick guide:
- Below 30 PSI: Too low. This can cause poor shower pressure, slow-filling appliances, and may indicate a leak or a problem with your plumbing guides.
- 30–40 PSI: Acceptable but on the low side. Consider a booster pump if you have multiple fixtures running simultaneously.
- 40–60 PSI: Ideal range. This is what most manufacturers recommend for appliances and fixtures.
- 60–80 PSI: Acceptable but monitor for signs of stress on pipes. Consider installing a PRV if it's consistently above 70.
- Above 80 PSI: Danger zone. High pressure can cause water hammer, burst pipes, and premature failure of appliances. Install a pressure reducing valve immediately.
If you're planning any kitchen remodel or bathroom remodel, testing your water pressure beforehand is a smart step. It ensures that your new fixtures will work optimally and that your plumbing can handle the upgrades.
Choosing the Right Water Pressure Test Gauge for Your Needs
Not all water pressure test gauges are created equal. When shopping for a gauge, consider these factors:
- Accuracy: Look for a gauge with an accuracy of ±1-2% for reliable readings.
- Range: A gauge that measures 0–100 PSI or 0–200 PSI is suitable for most residential use.
- Material: Brass or stainless steel fittings are durable and resist corrosion.
- Dial Size: A 2-inch or 3-inch dial is easier to read.
- Connection Type: Most gauges use a standard 3/4" hose thread (GHT) or 1/4" NPT. Ensure it matches your spigot or valve.
For most homeowners, an analog gauge is sufficient and affordable. Digital gauges offer more precision but come at a higher cost. If you frequently need to test pressure, investing in a high-quality gauge is a wise decision.
Pro Tip: A water pressure test gauge is a diagnostic tool, not a permanent fixture. For continuous monitoring, consider installing a pressure gauge on your main water line near the shutoff valve.
Common Water Pressure Issues and How to Fix Them
Here are some typical problems you might discover during testing and the best ways to address them:
- Low Pressure Throughout the House: This could be due to a partially closed main shutoff valve, a faulty pressure regulator, or a how to increase water pressure in your home issue like a clogged pipe.
- Low Pressure at One Fixture: Often caused by a clogged aerator or a faulty valve. Clean the aerator or replace the cartridge.
- High Pressure (Above 80 PSI): Install or adjust the pressure reducing valve (PRV). If you don't have one, contact a plumbing contractor near me for installation.
- Fluctuating Pressure: This can indicate air in the pipes, a failing pressure tank (if you have a well), or issues with the municipal supply. Check your system and consult with a professional.
Regular testing can also help you plan for larger projects. If you're considering bathroom renovation or upgrading your water heater, knowing your pressure ensures your new equipment will perform as expected.
When to Call a Professional Plumber
While testing your water pressure is a DIY-friendly task, some situations require professional expertise. Call a licensed plumber if:
- You consistently get readings above 80 PSI and need a PRV installed.
- You suspect a hidden leak, indicated by a pressure drop when all fixtures are off.
- You have low pressure and suspect a problem with your main supply line or well pump.
- You notice discolored water or sediment along with pressure issues.
A professional can perform a comprehensive home renovation 101 diagnosis and ensure your entire system is safe and efficient. Regular maintenance, including pressure testing, can save you thousands in emergency repairs.